Koenigsberger Klopse. Not for capers haters.

cut open meat ball
This is a real granny dish. My grandma cooked it, telling me it reminded her of her own childhood – and I also found similar recipes in my oldest cook book, which dates form 1926. Seems it’s named after the town of Königsberg, which is now in Russia and called Kaliningrad. Quite a bit of history, ain’t it?

Anyway, basically you make meat balls, cook them in a savory broth and serve them in a Béchamel sauce with capers. Tons of capers. So please, do not make this for anyone who hates them.

sardine can
And the secret ingredient is – if you like to call it like that – anchovies. I know, they’re gross. I mean, really. And this might seem totally unreal coming from me, who absolutely despises every food that comes out of the ocean: you MUST put in anchovies! Otherwise it just won’t taste good. Trust me, you won’t taste any fishiness, instead this small amount of fish acts as a flavor enhancer (unless, of course, you are allergic to fish protein. Then leave it out, for heavens sake!). And why are sardine packagings always so pretty? 

OK, let’s travel back in time:

KOENIGSBERGER KLOPSE
for 4, adapted from “Basic Cooking”

MEAT BALLS
1 day-old bread roll or 3 slices toast, cut into cubes
125 ml / 1/2 cup milk, hot
1 egg
1 tablespoon Dijon mustard
4 anchovy fillets (OR 1 sardine OR 1-2 tablespoons anchovy paste)
2 shallots, very finely chopped
1 teaspoon butter
peel of 1/2 lemon, very finely grated
5 sprigs parsley, chopped
500 g ground veal (OR beef)
salt and pepper
nutmeg, freshly ground

SAUCE
1 liter / 4 cups beef broth
2 bay leaves
1 small onion, very finely chopped
2 tablespoons butter
2 tablespoons flour
250 g / 1 generous cup cream
100 g / 3.5 oz capers

bread, egg, mustard and sardine paste
Soak the day-old bread cubes in the hot milk, then mix in the egg, mustard and the chopped anchovies. I know, it looks and smells disgusting, but bear with me…

Also, sweat the chopped shallot in a little bit of butter, just until they are getting soft.

ground beef with condiments
Mix the bread mixture into the ground meat and season everything with salt, pepper, freshly grated nutmeg (thank you, inventors of the Microplane grater!), lemon peel (again, Microplane grater) and chopped parsley.

Do not worry if you can’t see the parsley, I simply forgot to buy some. So, not a crucial ingredient, but parsley is always nice.

If you don’t like tasting raw meat (or just aren’t allowed to), here’s a trick: just take a tablespoon of the meat mixture, roll it into a ball and fry it in butter in your smallest pan or pot. So you can taste the finished meat balls without realizing too late there’s salt missing.

disher
Time to form the meat balls. You want them as uniformly as possible, that’s why I use a #16 disher. You could of course eyeball it or – if you’re really OCD, use a scale.

rolled meat balls
To roll the meat balls, always moisten your hands after each one, so that they will all be nice and smooth.

broth for cooking the meat balls
Bring the broth to boil and add the bay leaves and some pepper corns – the wider the pot, the better. Then reduce the heat to low, gently put in the meat balls and let them simmer for 10-15 min.

Then fish out the meat balls with a slotted spoon and let them rest on a plate. Also fish out the bay leaves and peppercorns and throw them away. And do keep the cooking liquid, it’s the base for our sauce.

sweating onions
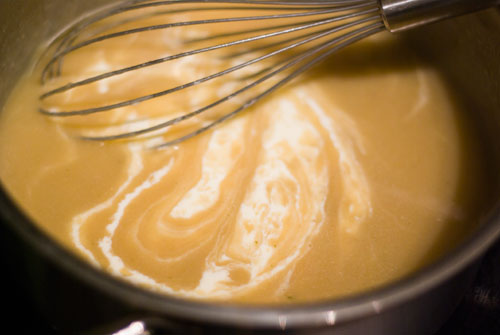
Grab a new pot and start your basic Béchamel: sweat the onion in some butter until they’re soft, then add the flour.

roux
Stir with a whisk and let it all cook until it looks light golden, then add your meat ball cooking liquid (about 2-3 cups of it) and let it simmer for 10-15 minutes – while stirring every minute or so.

finishing the bechamel
You should now have a very delicious sauce, which you will make even more delicious by stirring in a cup of cream. Give it a taste, maybe a little bit more salt or lemon juice?

reheat meat balls in sauce
Gently put the meatballs into the sauce and make sure they are all submerged. Add the drained capers and let it simmer for a couple of minutes until you are sure everything is hot.

serve with rice
Serve with buttered rice and lots of sauce.

In the very unlikely event you should have leftovers: freeze them in a muffin tin (works best with silicon), one meatball per cup and distribute the sauce evenly. Once everything is set hard, plop them out of the muffin tin and put 2 each in labeled bags. Homemade convenience food!

Chili. Hot stuff for cold days.


Chili. I guess there is not much to say. Of course, there are different beliefs: beans or no beans, ground meat or pieces, vegetables or no vegetables. This may sound totally crazy, but I like all kinds of chili. But depending on my mood, I sometimes prefer one variation over the other.

What’s really much more important: the spices and liquids you add. And in my case, it’s whiskey (with a nice amount of peat), red wine and dark ale. Fresh and dried chilies are a must.


CHILI

1 kg / 2 pounds beef (from the round)
100 g / 3,5 oz bacon
1/4 cup lard or olive oil
1 large onion, roughly chopped (2 cups)
3 carrots, diced (2 cups)
100 g / 3.5 oz tomato paste
1/4 cup whiskey
1 cup red wine
1 cup dark ale
1 can peeled tomatoes
2 bay leaves
1-5 fresh chilies, eg 1 habanero, 1 jalapeno, 1 Thai chili
3 tablespoons chili tequila
1 teaspoon dried chili
1/2 teaspoon cinnamon
2 teaspoons salt
2 teaspoons cocoa powder
2 teaspoons instant coffee powder
1 tablespoon dried Italian herbs
1 can kidney beans, drained (optional)
1 lemon, just the juice, to taste

To serve:
cheddar cheese, shredded
spring onions, cut into thin slices
sour cream
bread


Cut the meat into the size you like for a chili – anything between 1-inch cubes and mincing it. Then peel and cut the onions and carrots into large dice.


I like to start with the bacon, getting it brown and rendering the fat. When it is nice and crunchy, get it out and put it into a bowl.


Then add the lard or oil, let it get hot and start sauteing the onions and carrots. When the edges start to get brown, also get them out into a bowl.


Get your stove to medium-high and let it get really hot for some minutes. Don’t dump all the meat in – better start with just a few handfuls. Just let it brown for a couple of minutes, then start stirring it around. When all the sides of the meat are brown, add the next few handfuls. And so on until all the meat is in the pot and browned nicely.


OK, now the bacon and the vegetables go back in, and also the tomato paste. Add the whiskey, stir and scrape the bottom until nearly all is evaporated. Then add the wine and the beer – and top it off with water (or even some coffee you have still standing around).


Next add the can of tomatoes. Don’t worry if it looks like too much liquid, most of it will cook off anyway.


Time for some heat: Add the chilies – either whole or cut into pieces. I like to buy big bunches of fresh chilies and preserve them in alcohol.

Just cut away the green stuff, fill them in a glass jar and top it off with your favorite 40%-spirit. I like to use either Sherry, Cognac or Tequila. Keeps nearly endlessly and is a great addition for all kinds of tomato-based meals.


Add the rest of the spices and let it cook on very low for around 2 hours. Or longer, if you have the time.

Serve with spring onions, shredded cheese, crème fraîche and a nice toasty bread. Not to forget: a nice glass of cold beer to kill the heat.

Hot pumpkin soup. Getting ready for Halloween.


Here in Germany, some people started to celebrate Halloween – nowadays, you can even go to parties. But 15 years ago, living in a small town, my friends started the tradition of cooking American food, preferably something hot and watching horror movies. Over the years, we made tons of different things – chili, homemade burgers, spaghetti with meat balls. But one thing remained consistent over the years: pumpkin soup as a starter.

This one is creamy, meaty and bacon-y and of course: hot. But let me assure you: except for the crème fraîche I used for serving, it’s vegan!


HALLOWEEN PUMPKIN SOUP

1 Hokkaido pumpkin, about 1 kg / 2 pounds
1/4 muscat pumpkin, about 1 kg / 2 pounds
1 large onion, diced
4 red potatoes, peeled and diced
2 fresh chilies, cut into rings
3 cloves of garlic, sliced
3 tablespoons olive oil
1 tablespoon brown sugar
1 tablespoon curry powder
1 tablespoon smoked paprika powder
1 tablespoon vegetable broth powder
1 can peeled tomatoes
salt and pepper to taste
chili sauce
lemon juice
crème fraîche for serving


Preheat your oven to 200°C / 400°F and search your kitchen for some kind of ovenproof vessel you pumpkin will fit in. In my case, a 9×13 inch pyrex form.

Cut the Hokkaido pumpkin in half and scoop out the innards – personally, I think an ice cream scoop is the best tool for the job. Then place the pumpkin halves in the form, sprinkle with oil, salt, sugar and maybe a little bit paprika powder.

Place the in the oven for about half an hour. Or until the flesh is soft and you have a nice brown crust.


OK, now we can concentrate on the soup itself:

Remove the seeds and peel from the muscat pumpkin, then dice it coarsely. Peel and dice the rest of the vegetables and slice the chilies.

Heat up a big pot, then pour in the oil and start browning the vegetables. Stir often; you’ll want some brown bits for taste.


When the vegetables are starting to get soft, sprinkle with curry and smoked paprika powder.


Look out for this stuff – I bought it in Spain during my vacation, but I’m sure you will find it elsewhere, too.

I don’t like the expression, but this is the “secret ingredient” to the soup. Basically, it gives kind of a subtle bacon flavor.


Next, pour in the peeled tomatoes and enough water to cover and let it cook for around 20 minutes or until you can just mash the vegetables with the back of a spoon.


When it looks like this, puree it with your favorite method – mine being a stick blender. But a stand mixer or food processor will also work fine.

Give it a taste and add salt, pepper, chili sauce and lemon juice accordingly.


To serve, get the pumpkin halves out of the oven and each into a bowl. Fill the soup into the pumpkin bowl and (if you’re not vegan), garnish with a healthy spoonful of crème fraîche.

Carrot dip. The mean brother of baby food.


This looks so innocent, doesn’t it? I really reminds you a bit of baby food, if it weren’t for the olives, right? Go ahead, take a bite. At first, you think: “What is she talking about? Just regular carrots. A bit on the sweet side.” And then it will hit you: the tartness of the lemon juice. The slight bitterness of the olive oil. The complexity of the spices. And last, but not least: the slight burn of chili in your throat.

This is a great dip and it goes very well with all those other oriental-inspired dips, hummus, baba ghanoush and tzatziki. Just serve them all with some pita bread and olives and you have a simple, but very satisfying dinner.

CARROT DIP

250 g / 1/2 pound carrots, peeled and diced
salt
2 garlic cloves, crushed
2 tablespoons lemon juice
1 teaspoon ras-el-hanout (or ground cumin)
1 tablespoon harissa
2 tablespoons olive oil, plus some for garnishing
olives


Around here, you always get carrots in 1 kilo / 2 pound packages. Minimum. So most times, I take the rest of the package I did not use and eyeball the amount of the rest of the other ingredients.


Peel the carrots, cut them into finger-thick slices and cook them in very salty water for about 20 minutes. They should be soft, but not falling to bits.


In the meantime, mix together lemon juice, crushed garlic, ras-el-hanout and olive oil. Hold the salt, there will be already enough in the carrots.

I like to use my immersion blender for this, so I start in a rather high and narrow mixing bowl. But feel free to use a food processor if you happen to own one.


Drain the carrots and put them over the harissa-mixture. Then puree them as fine as you want them. Personally, I like some bits left, otherwise it reminds me too much of baby food…


Serve in a nice bowl when it is cooled down, garnish with some olives and olive oil. Then dig right in.

Coq au vin. The chicken version of Beuf Bourguignon.


Ever since the movie “Julie & Julia” came out, everyone seems to be crazy about Julia Child’s version of Beuf Bourguignon. I know, Beuf Bourguignon is a great dish, but sometimes you just can’t find the right beef in the supermarket or at your butcher’s. Or you just don’t want to spend the money. On the other hand, 4 chicken thighs only cost around 2 Euro. Seemed like a deal to me.

Oh, and there’s a simple rule about cooking with wine: don’t use anything that you wouldn’t drink. But you don’t have to use the most expensive one; a simple wine in a real bottle will do fine. Real French gourmet food for a couple of bucks. Perfect.


COQ AU VIN

2-3 small onions, peeled and diced (1 cup)
2-3 carrots, peeled and diced (1 cup)
2-3 celery sticks, peeled and diced (1 cup)
6 thick slices of bacon, cut into strips
6-8 chicken thighs
flour
salt and pepper
3 tablespoons vegetable oil
1 bottle red wine, shiraz or pinot noir
3 bay leaves
6 juniper berries
8 button mushrooms
1/2 cup heavy cream
1 tablespoon corn starch


This is the great triumvirate of French cooking: onion, carrot and celery. The base of all kinds of meat dish with. Just cut them into 1 cm / 1/4 inch cubes. While you’re at it, also cut the bacon into strips.

Preheat your oven to 165°C / 325°F.


Mix some salt and pepper into the flour, then dredge the chicken thighs in the flour. They should be covered on all sides.

Heat up a big pan on medium, pour in the vegetable oil and start frying the chicken thighs. Just don’t overcrowd the pan, 4 at a time are more than enough. They will need around 5 minutes on each side, you want them golden brown – but no need to cook them through, we’ll get to that later.

Stack them into a large pot, I like my cast iron Dutch oven for that.


When you’re done frying the chicken, put the vegetables into the pan and cook them until they are softened but not too brown. That should take about 10 minutes, stirring occasionally. Put all the vegetables into the pot with the chicken parts.


Then fry the bacon first and then the mushrooms – put the bacon into the pot and set the mushrooms aside.


Should look a bit like this – a pot full of chicken, vegetables and bacon. Already smells like heaven.


Don’t forget about the pan, because there is still all the good brown stuff at the bottom and you definitively don’t want to throw that away. Instead, pour in about a cup of the red wine and start scraping the bottom with a spatula. Loosen all the bits from the bottom and let it cook for a minute, then pour it into the Dutch oven.


Top it off with the rest of the wine and maybe a little bit of water. Add some salt, the bay leaves and the juniper berries.

Then put on the lid and place it in the oven for about 2 hours. Or you could prepare it until this point and cook it the next day, then it will be even more tender and flavorful.


When the 2 hours in the oven are over, check if the chicken is tender – you should be able to part the meat with a fork.

Carefully get out the meat and put the thighs on a platter. Fish out all the vegetables and spices using a strainer or a slotted spoon. Mix in the cream and if you want to, thicken the sauce with a slurry made of corn starch and water. Just mix those two together, pour it into the sauce and let it cook for a minute. As a last thing, add the mushrooms to the sauce and give it a taste – and season to your taste. I almost always need more salt.


Serve the chicken parts with the sauce, the mushrooms and your favorite side, mine being simple oven-roasted potatoes. Makes sense since the oven is hot anyway.

Picadillo. With cinnamon and raisins.


Picadillo is one of the most versatile ragús in South American cooking. You can simply eat it with rice, preferably accompanied by a fried banana. Or use it as a filling for empanadas or pastel de papas – which is best described as the Argentine version of Shepard’s Pie. But more on that in another post, first we are going to make the Picadillo.

PICADILLO

1 cup carrots, finely diced (2-3 carrots)
1 cup onions, finely diced (2-3 onions)
1 cup bell peppers, finely diced (1-2 small peppers)
2-3 garlic cloves, finely chopped
2-3 tablespoons olive oil
750 g / 1.5 pounds ground beef
1/2 cup tomato paste
1/2 cup red wine (or Martini rosso)
2-3 tablespoons dried oregano
1 teaspoon dried chili flakes
1 tablespoon paprika
1/2 teaspoon cinnamon
1/2 teaspoon coriander
salt and pepper
1 cup green olives, chopped
1/2 cup raisins


Dice up all the vegetables, I like 5 mm / 1/4 inch cubes. No need to measure them exactly, just make sure you have roughly the same amount of onions, carrots and peppers.


Heat up a big pan (or heavy pot), then pour in some oil and start frying the ground beef.

Don’t dump in everything at once or the pan will cool down instantly and you’ll be cooking the meat instead of frying it. Which is not good, as many of the juices will come out, making the meat tough and the water will prevent browning. And in my opinion, the brown stuff is what makes the sauces taste so good. Seems I’m not alone, as there’s even a scientific name for it: Maillard reaction, meaning the caramelization of of sugars and proteins by high heat.

So just put in a quarter to a third, wait till it is all cooked through and then add the next batch. Then let that cook together and add the last third…


Once the meat is cooked through and has some nice browned spots, add the vegetables and let them fry together.


Let it cook for some minutes more, depending how much time you have and how patient you are. Just make sure there are some browned bits. That may sound a bit obsessive… I admit it, I’m obsessed with Maillard reaction.


Make a little room in the middle and add the tomato paste, let that also fry for a bit. Again, sugars will caramelize and add some subtle flavors. Then add the wine and scrape all the brown bits off the bottom of the pan. The will dissolve and make everything very tasty. Then add some water, just short of covering it.


Now add all the spices: oregano, chilies, paprika, salt and pepper. And yes, you heard right: cinnamon and ground coriander. At first, it seems very weird to add cinnamon to a savory dish, but believe me it will blend perfectly with the other spices…


Then add the olives and the raisins and let it all cook on low for 30 minutes minimum. Why yes, raisins. They’re traditional. No point in arguing about that.

Give it a taste, maybe add some lemon juice and more salt and serve. 

Jalapeño poppers. Some like it hot.


Funny how people react to different kinds of hot. Some people don’t mind hotness at all, even search the kick of new levels of hotness. Others flinch at even the slightest amount – I once knew someone who broke into tears and sweat because of a couple of drops of Tabasco someone sneaked into his burger. I guess I’m in the middle: liking the hotness of chilies, unless it totally overwhelms the taste of your food.

This recipe is a work of genius. So incredibly simple, you don’t even think about measuring the ingredients. Delicious beyond description. The chilies are reasonably hot, the cream cheese will even that out a bit. And bacon can never be a bad thing, can it?

JALAPEÑO POPPERS
(adapted from Pioneer Woman)

fresh jalapeños
cream cheese
salt and pepper
bacon
latex gloves, optional


Before you start anything, put on the latex gloves. Trying to get our your contact lenses with capsaicin-stained fingers is no fun. Let alone touching other – ahem – sensitive areas. So do yourself a favor and wear protection.

Cut the chilies in half lengthwise, then use a spoon, a melon baller or a measuring teaspoon to scoop out the the white stuff and the seeds. The white stuff is where the most of the capsaicin lies.


Then simply take the cream cheese and smear it into the jalapeños, filling them to the brim. Sprinkle on some salt and pepper, if you like.


Cut the bacon slices in half and wrap them around the filled chilies. Either put them on the BBQ or – if you happen to live somewhere downtown like I do – bake them in the oven at 180°C / 350°F for 20-25 minutes.

Sorry I don’t have a picture of the finished jalapeños, they were so good the were simply gone too fast!

Steak au poivre. Even purists will love it.


When it comes to steak, I’m a purist. Salt, pepper, maybe a tad of herb butter and I’m happy. No crazy marinades, no BBQ sauce, no oysters, thank you. Oh, and medium rare, please.

But sometimes you may need a tiny bit more, maybe a little sauce to make the fries go down easier. And this is where Alton Brown comes in. In his show “Good Eats” he did not only present how to manage to get steaks out of a whole fillet, he also made a very minimalistic sauce. Just cream, cognac and pepper. It’s a dream, it goes perfectly well with a steak without totally smothering its taste. Just what I like.


FILET AU POIVRE
adapted from Alton Brown

2 tenderloin steaks, 4 cm / 1.5 inches thick
coarse salt
1 tablespoon whole peppercorns
1 tablespoon butter
1 teaspoon olive oil
80 ml / 1/3 cup Armagnac or Cognac, plus 1 teaspoon
250 ml / 1 cup heavy cream
1 teaspoon veal fond, powdered
1 teaspoon maple syrup
a dash of lemon juice
small packet of (frozen) fries


First, the steaks. Marvelously marbled, aren’t they? Make sure you have steaks at least 1 inch / 2.5 cm thick, but if you like them medium rare (the only way to go, really) have them cut 1.5 inch / 4 cm thick.

Get them out 30 to 60 minutes before you start cooking as you want to get them to room temperature. I think it’s horrible if a steak is nearly burned on the outside and almost frozen in the middle…


Crush the pepper quite coarsely, either with pestle and mortar or the biggest setting on your pepper mill.


Sprinkle the steaks with salt and cover them with the coarse pepper. Press it on lightly with your fingers, but no need to worry if some pepper corns fall off.

Meanwhile, start making the fries with your preferred method.


Heat up your pan (I prefer cast iron) on medium-high, melt the butter and add the olive oil. Nobody knows why, but a bit of oil prevents butter from going brown so quickly.

Put in the steaks and set the timer for 4 minutes. 4 cm and 4 minutes results in medium rare. Genius! Turn them over and give them another 4 minutes.

Then get them out on a warmed plate and cover them lightly with aluminum foil. Takes quite a bit of patience, but if you were to cut into the steaks right away, all the good juices would run out and leave you with a dry bit of meat. Not good.


Pour in the Cognac or Armagnac, then start scraping on the bottom of the pan to remove all the pepper corns and delicious crusts.
DO NOT SET TO FIRE! 80 ml is quite an amount of alcohol and I would nearly have set my kitchen to fire. Instead, let it cook down slowly until it’s nearly gone.


Pour in the cream, dissolve the fond powder and let it cook for 5 minutes until the consistency is slightly thicker than regular cream.


Give it a taste and add salt, maple syrup and lemon juice if you like, then serve.


Serve the steak, the fries and the sauce on a nice plate and pour in a nice glass of red wine. Or beer.

Iced Tea. Thirst quencher for hot days.


There are few things more refreshing than iced tea on a hot summer day. And I don’t mean those over-sweetened soft drinks laced with artificial flavors, preservatives and other stuff you don’t really want to know about. Better make it yourself, it’s ready in 5 minutes. Go ahead and time it, I’m not exaggerating. And another thing: it helps against those mean headaches.

ICED TEA

1 liter / 4 cups water, boiling
1/2 kg / 1 pound ice cubes
6 teabags or 6 teaspoons black tea
0-4 tablespoons sugar
juice of 1 lemon


Take 6 teabags or 6 heaping teaspoons of loose black tea. Bring the water to boil and when it’s really bubbling, pour it over the tea.


Let it steep for exactly 4 minutes. Then the tea will be strong, but not too bitter. Take out the tea bags or strain the tea if you used loose tea. Then dissolve the sugar in the hot tea – the amount depends on your taste.


Weight out the ice in a big pitcher. You need half the amount by weight as you have tea.


Slowly pour the hot, sweetened tea over the ice cubes. Then add the lemon juice – also according to your taste – and you’re done! Grab a big glass, maybe a straw and sit outside in the sun with your feet up.

Tuna salad filled tomatoes. Hello from the Fifties.


A friend gave me a cookbook from the Fifties as a birthday present a couple of years ago. It is two inches thick and full of wonderful recipes, helpful hints on using leftovers – and even more delightful tips on shaping your food aerodynamically to make it more appetizing. There, I found great classics like meat loaf (in a dozen of variations), upside down pineapple and carrot cakes as well as tomatoes filled with different mayo-based salads, eg egg, chicken or tuna.

My mom used to make the tuna version as appetizer for guests: it’s quick and easy, filling but not too much and enjoyed by everyone, whether they like fish or not. Including me and my dad, who virtually despise everything that comes out of the ocean.

TOMATOES FILLED WITH TUNA SALAD

1 can tuna, drained
1 small onion, chopped very finely
1/4 cup peas
1/4 cup corn kernels, optional
1/4 – 1/2 cup mayonnaise, homemade
paprika powder
some drops of hot sauce
salt and pepper
4-6 tomatoes


Drain one can of tuna – doesn’t matter if you bought the one in oil or brine.


Take a small onion and dice it very finely – onions and tuna are a match made in heaven. And add the peas, I only had frozen (and blanched) ones. But you can take fresh or canned ones if you like.


OK, let’s spice it up a bit. Add some paprika powder for taste and color and maybe some drops of chili sauce, if you happen to like it hot.


Add some tablespoons of mayonnaise and start stirring. Just add enough to make it just come together. Not too much mayo or it will become slushy.

If you like you can cut open some tomatoes, scoop out the kernels with a spoon and fill in the tuna salad. Simple, ready in minutes and impresses you guests.