Apricot rolls. Like cinnamon rolls, but different.


These rolls are a bit like cinnamon rolls, but filled with apricot jam and some other yummy things. My mom found this recipe in a German baking magazine ages ago and it’s a regular in our recipe repertoire since the first time we tried it out. I was still a kid and soon I started making this on my own. Mind you – yeast dough! Don’t be afraid, it’s so easy a kid can do it!

Follow me and I show you how it works.


APRICOT ROLLS

DOUGH
1 packet or cube of yeast
125 ml / 1/2 cup milk, warmed (water also works)
500 g / 18 oz / 4 1/2 cups flour
50 g / 1/4 cup sugar
2 eggs
150 g / 1 1/2 sticks butter, room temperature, cut into cubes
1/2 teaspoon salt

FILLING
200 g / 7 oz / 2/3 cup apricot jam
100 g / 3.5 oz / 1/2 cup sugar
100 g / 3.5 oz / 1 cup chopped almonds
100 g / 3.5 oz / 3/4 cup raisins
1/2 teaspoon cinnamon
2 tablespoons rum

GLAZE
6 tablespoons powdered sugar
some drops of lemon juice


Behold!!! The mighty yeast. Alton Brown would say something like that. I say: Don’t worry, it’s just yeast. Only costs cents in the supermarket. I also always have dried yeast packages in my pantry, but I like the original stuff better. Maybe because you can feel and smell it.


Bring half a cup of milk to body temperature. I kicked out my microwave – it took too much space – so a measuring cup on the stove works great. The milk should be just as warm as your finger.

Umm, yes. The stove is dirty and has some cracks. I do not have a perfect kitchen.


Put the flour in a mixing bowl (no need to sift) and push it to the sides. Crumble in the yeast (hmm, smells good) and sprinkle in the sugar. Pour over the warm milk and let it all sit for 15 minutes.


Oh my god! It’s alive! Well, the yeast becomes active with sugar, water and warmth.

It starts eating the sugar and digesting it into carbon dioxide, which results into those teeny tiny bubbles that make the dough fluffy. And alcohol, but here are only trace amounts. Leave the dough sit for 3 days and you will taste the alcohol. It’s the same yeast the use for beer brewing.

Crack in the eggs and add the butter cubes, then start mixing on low with a dough hook.


Keep mixing on medium-low until all the butter pieces are gone and the dough is not sticking to the bowl any more. At first, things will be very sticky, so keep the machine running until you see it coming off and basically could take out the dough and have clean bowl. Rather clean bowl, the bottom will always stick a little.

Cover with a tea towel and place the bowl in a warm space for around 30 minutes, if you’re impatient. Or just leave it where it is for an hour or two. And if you really have time on your hands, put it in the fridge overnight. The slower and colder the process, the finer the taste and texture of the dough.


Key is, the dough should double in size. Sometimes it even triples in size. See the fluffy texture? Just like a pillow.


In the meantime, mix together all the ingredients for the filling. Nothing special about that.


Get the dough out of the bowl and onto your favorite rolling surface. I like my extra big silicon mat.

Press the big air bubbles out and knead it a bit. No need to get aggressive (but do, if you feel like it!), just work it through to redistribute the butter and the yeast.

That day, I decided to bake only half of it and freeze the rest. Works wonderfully. And the flatter you press the dough the faster it will freeze. And unfreeze, which can be really important…


Now, roll out the dough patiently and gently. Try to get it as thin as possible, this was about 3 mm. Just don’t go too thin or it will tear. Then trim the edges so that you will have roughly a rectangle.


Spread on the yummy apricot mixture and start rolling it up. It’s up to you if you start from the long or the short edge, depending if you like thinner or thicker rolls.


Cut this dough roll into 1 inch / 2.5 cm slices, this works best if you froze it for half an hour or use a really sharp knife. Place them in a pie pan or directly on a baking sheet. Be patient and let them sit there for another half an hour.

Depending on the time your oven needs, preheat to 200°C / 400°F.


Bake for 12-15 min, until golden brown and delicious. They’re great just like that, but even better with a glaze.


And this is really simple – just mix the powdered sugar with some drops of lemon juice until you have the consistency of honey.


Spread it on the rolls, lick your fingers and spoon clean of the glaze and then take a blissful first bite.

Upside down pineapple carrot cake. Who needs frosting?


This simply is a great cake. Or muffin. My mom has a friend called Debbie and she’s from Texas, but has been living in Germany for a long time. She once made the cake when I was a teenager and I was blown away. It was cinnamony, had complex flavors and the concept of carrots in a cake was absolutely new to me, She was kind enough to give me the recipe and I have baked it since on uncounted occasions. It’s great every time: fluffy on the inside, somewhat spicy, nuts and caramelized top for the crunch, pineapples for juiciness. I’ve never made a frosting for this cake (it would be a shame to cover up those beautiful pineapples) and personally, I don’t think it needs one.

But if you really insist on putting something on this cake, some vanilla ice cream goes tremendously well with it. Especially if the cake is still warm.

UPSIDE DOWN PINEAPPLE CARROT CAKE
12 muffins or 1 cake (26 cm / 10 inch diameter)

2 cups / 1/2 liter carrots, finely grated (4-6 carrots)
butter for the pie pan
brown sugar for the pie pan
1 can sliced or diced pineapples, drained well
1 1/2 cups / 180 g flour
1 1/2 cups / 300 g sugar
1/2 cup / 60 g chopped nuts, eg pecans or almonds
1 1/2 teaspoons baking soda (sodium bicarbonate)
1 1/2 teaspoons baking powder
2 teaspoons cinnamon
1 teaspoon ground ginger
1/4 teaspoon nutmeg, freshly ground
1 teaspoon salt
3/4 cup /180 ml vegetable oil
3 eggs
(vanilla ice cream or whipped cream for serving, optional)


First of all, preheat your oven to 190°C / 375°.Then start peeling and grating the carrots until you have enough. You could do this by hand, but I recommend some kind of machinery (I use my Kitchen Aid). Carrots are kinda hard and will cost you a lot of time and elbow grease to get them all down to bits. Not to mention fingernails.


Time to prep the cake pans. I like the silicon pans from Téfal (called T-Fal in the US, I believe), because they have a metal support ring so they’re not wobbly. Smear the insides thickly and thoroughly with butter, then fill about a tablespoon coarse brown sugar in each mold and tap and shake and turn until all buttery sides are coated with sugar (do this over the sink). Then put in a piece of well-drained pineapple.

Yeah, I know. They say you don’t have to butter silicon pans for baking pans. I don’t believe it. I’ve had a couple of cakes destroyed because the pan didn’t release it. And besides, you do like a crunchy caramel crust on your cake, don’t you?


This time, I made the double amount of cake, so I also prepped a regular cake pan.


Time to get out a big bowl. Measure in the flour and the sugar. By the way, if you don’t like sifting your flour, just stir it a couple of times with your wire whisk until you see no more lumps.


Now add the baking powder and soda, the nuts (in this case slivered almonds), salt, nutmeg, cinnamon and ginger, then mix it all together.


In another bowl, mix together the oil and the eggs.

Don’t be surprised about the 7 yolks – I made the double amount of dough and I added and extra egg because the eggs were so small.


Pour the egg-mixture gingerly on top of the flour-mixture. Kinda looks like a giant egg, doesn’t it?


Now stir it all together until you see a dough forming. Don’t overmix and don’t worry about some flour lumps left – 10 to 15 strokes should be enough. I guess it’s better to have some lumps in your cake than a tough cake – or muffins with big, tunnel-like holes.


Add the grated carrots and carefully mix them in, then equally distribute the dough on the muffin tins or in the cake pan. I recently found out that a disher (some call it ice cream scoop) is the perfect tool for that.


Feels good when a job is done!


Bake the muffins for about 20 minutes and the cake 40 minutes.


Get them out of the oven, let everything cool for at least 15 minutes (so that the caramel crust sets a bit), then turn the cake/muffin pan upside down and carefully pop them out.


Don’t they look great? Shiny, golden brown, juicy, crunchy, soft. Would be a shame to cover it all with frosting… Serve them as they are (great for breakfast) or with a dollop of whipped cream or vanilla ice cream.

Porridge. For when you’re ill.


Porridge is the perfect breakfast or snack when you’re ill. It’s warm, but you don’t have to stand long in front of your stove if you feel a little weak. It’s nourishing, but light and soothing if your stomach is acting up. And it’s an absolute no-brainer to make, which comes in handy if you feel like your head is exploding.

PORRIDGE
for 1

1/4 cup (1 part) rolled oats
3/4 cups (3 parts) milk
1-3 tablespoons sugar or honey
cinnamon
knob of butter

blackberries (optional)

Grab your smallest pot and fill in the oats and the milk. Just remember the volumetric relation 1:3 and you’ll always have a porridge with the perfect consistency.

Bring to a light boil and let the oats cook for several minutes, until it all thickens. Add sugar and cinnamon according to your taste.

Stir in and melt the butter for extra creaminess and garnish with some blackberries.

Blackberry Muffins. Last remnants of summer.


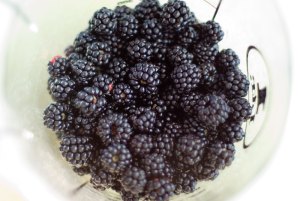
In September, I spent vacation in France. Right in the middle of nowhere between Bordeaux and Biarritz, to be exact. The landscape consists mostly of pine forests that have been planted 200 years ago and the understory is overgrown with ferns, erica and blackberry bushes. As it was exactly the right season for blackberries, my husband and I went for a little picking and photo tour. We came back with 122 photos and 2 cups of blackberries.

As I’m still not sure which fruit and what amount of it I can eat without getting the full effect of my fructose malabsorption, I decided to make some quick muffins (regular sugar “dilutes” that effect). But let me tell you: Baking in a small kitchen that does neither have a scale nor American-style measuring cups turns out quite difficult. Plus, the silicone 6-muffin pan I bought in France did not fit into the miniature oven. The hazards of cooking abroad 🙂

BLACKBERRY MUFFINS (12 regular ones)

2 cups / 250 g all purpose flour
1 cup /250 g sugar
2 tablespoons baking powder
1/2 teaspoon salt
1/2 cup / 60 g almonds, ground
2 eggs
1/2 cup /125 ml milk (or buttermilk)
3 tablespoons butter, melted
2 tablespoons / 30 ml dark rum
1 tablespoon / 15 ml lemon juice
1 tablespoon lemon zest
1 cup blackberries


What to do if the muffin pan does not fit into the oven? Or you don’t have a muffin tin? Take the baking sheet and place as many small cups as you can on it. At least, that is how cupcakes were invented.

As cups don’t have a non-stick coating as your regular muffin tin, coat them evenly and generously with butter and then flour. Smearing the butter into the cups will only work if they are 100% dry, as water and fat repel each other. Make sure the cups are really dry or your muffins will stick…

Oh, and preheat your oven to 200°C/400°F.


Next, try to find any kind of measuring device. As I knew that 1 cup is 1/4 liter, I could easily use this measuring glass for flour and sugar.


Measuring smaller amounts is a bit trickier, you could use a jigger (the pony/small part contains 20 ml, the larger part 40 ml, at least in Europe) or as in this case a cap of a medicine bottle. By the way, 1 tablespoon is 15 ml.

The rum you can see in the background, called “Negrita” is incredibly intense, nothing like the ones I used before and pastry chefs in Bordeaux making canelés generally use it. I guess it’s one of the little secrets that makes them taste so good.


Isn’t this cute? I found this nostalgically packed baking powder in the supermarket. In France and Germany, you get baking powder in little sachets, perfectly measured for 500 g or 4 cups of flour.


With all the searching and improvising, I totally forgot to make pictures when making the dough. Don’t worry, it’s really easy:

Grab a large bowl and mix the dry ingredients: flour, sugar, baking powder, salt and ground almonds. Use a whisk and you don’t have to sift the flour. Then create a little well in the middle.

Get another bowl or large measuring cup for the liquid ingredients: eggs, milk, melted butter, rum, lemon juice and lemon zest. Use the whisk again, especially when drizzling in the lemon juice, then the milk will not curdle. Put the whisk away and take a large wooden spoon or silicone spatula instead.

Now pour all of the liquid mixture into the flour mixture and very, very briefly stir it and don’t worry about lumps (Alton Brown says no more than 10 strokes). Finally, put in the blackberries and very gently stir for a couple of times until the berries are evenly distributed. Then put equal portions of muffin dough into the cups, but don’t overfill them.


Then hope that your vacation miniature oven (that is generally only used for reviving day-old baguette) is hot enough and put in the muffins immediately.

In a muffin tin, they would take 20 min., but the cups were a bit bigger, so they needed 30 min.


Get them out of the cups and let the muffins cool. Then enjoy with a glass of iced coffee on a summer day.

If cooking in a kitchen unfamiliar to you is a little adventure, then baking is even more so. But very much worth it!